Create a Heroku Pipeline and Run Review Apps /Créez un Pipeline Heroku et exécutez des Review Apps
Learning Objectives /Objectifs de formation
After completing this unit, you’ll be able to: /Une fois cette unité terminée, vous pourrez :
- Create a Heroku Pipeline and add your apps. /Créez un Pipeline Heroku et ajoutez vos applications
- Run review apps. /Exécutez des applications de contrôle
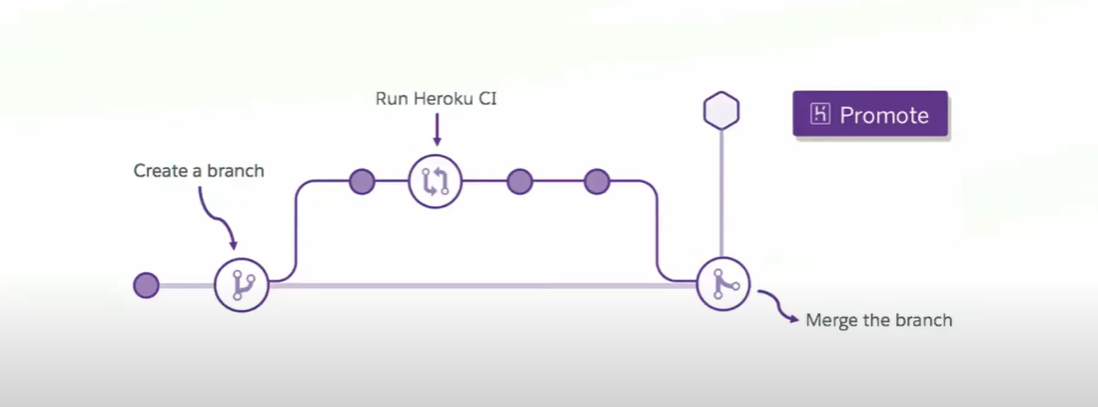
Now that you’re familiar with the features of Heroku Flow and the concepts behind them, let’s use that knowledge and create an instance of Heroku pipelines, run review apps, and check out how things actually work. /Maintenant que vous avez découvert les fonctionnalités d’Heroku Flow et les concepts sur lesquels elles sont basées, utilisons ces connaissances pour créer une instance de pipelines Heroku, exécuter des applications de contrôle et voir comment ça marche concrètement.
To create a Heroku pipeline, you need a Heroku account. Sign up for a free account if you don’t have one already at https://www.heroku.com/. You also need a GitHub account for this module. Create one for free at https://github.com/. /Pour créer un pipeline Heroku, vous aurez besoin d’un compte Heroku. Si ce n’est pas déjà fait, créez un compte gratuit sur https://www.heroku.com/. Vous aurez également besoin d’un compte GitHub pour ce module. Créez-le gratuitement sur https://github.com/.
Create a Pipeline: /Créer un pipeline :
Now you’re ready to create your first pipeline. /Vous êtes maintenant prêt à créer votre premier pipeline.
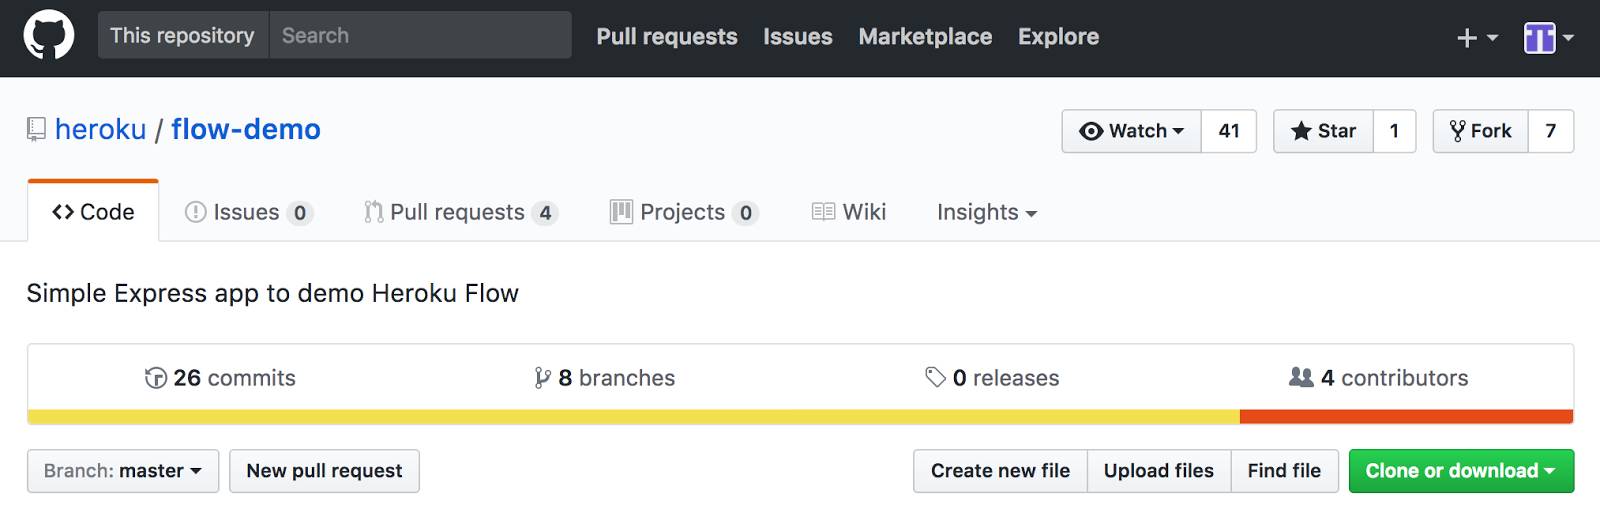
- Log in to your GitHub account and make your own copy of this repository by clicking Fork in the top right corner. /Connectez-vous à votre compte GitHub et faites une copie de ce dépôt en cliquant sur Fork (Copier) en haut, à droite.

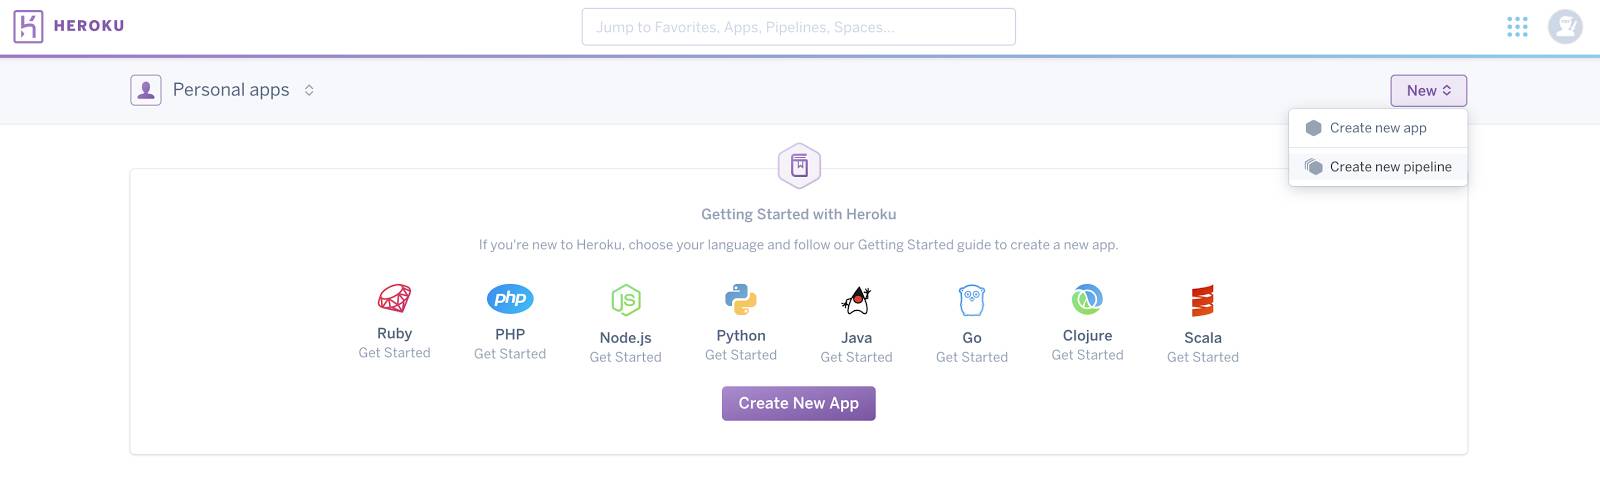
- Go back to Heroku, and click Login. Once you’re logged in, click New, then Create new pipeline. /Revenez à Heroku, et cliquez sur Login (Connexion). Une fois connecté, cliquez sur New (Nouveau), puis sur Create new pipeline (Créer un nouveau pipeline).
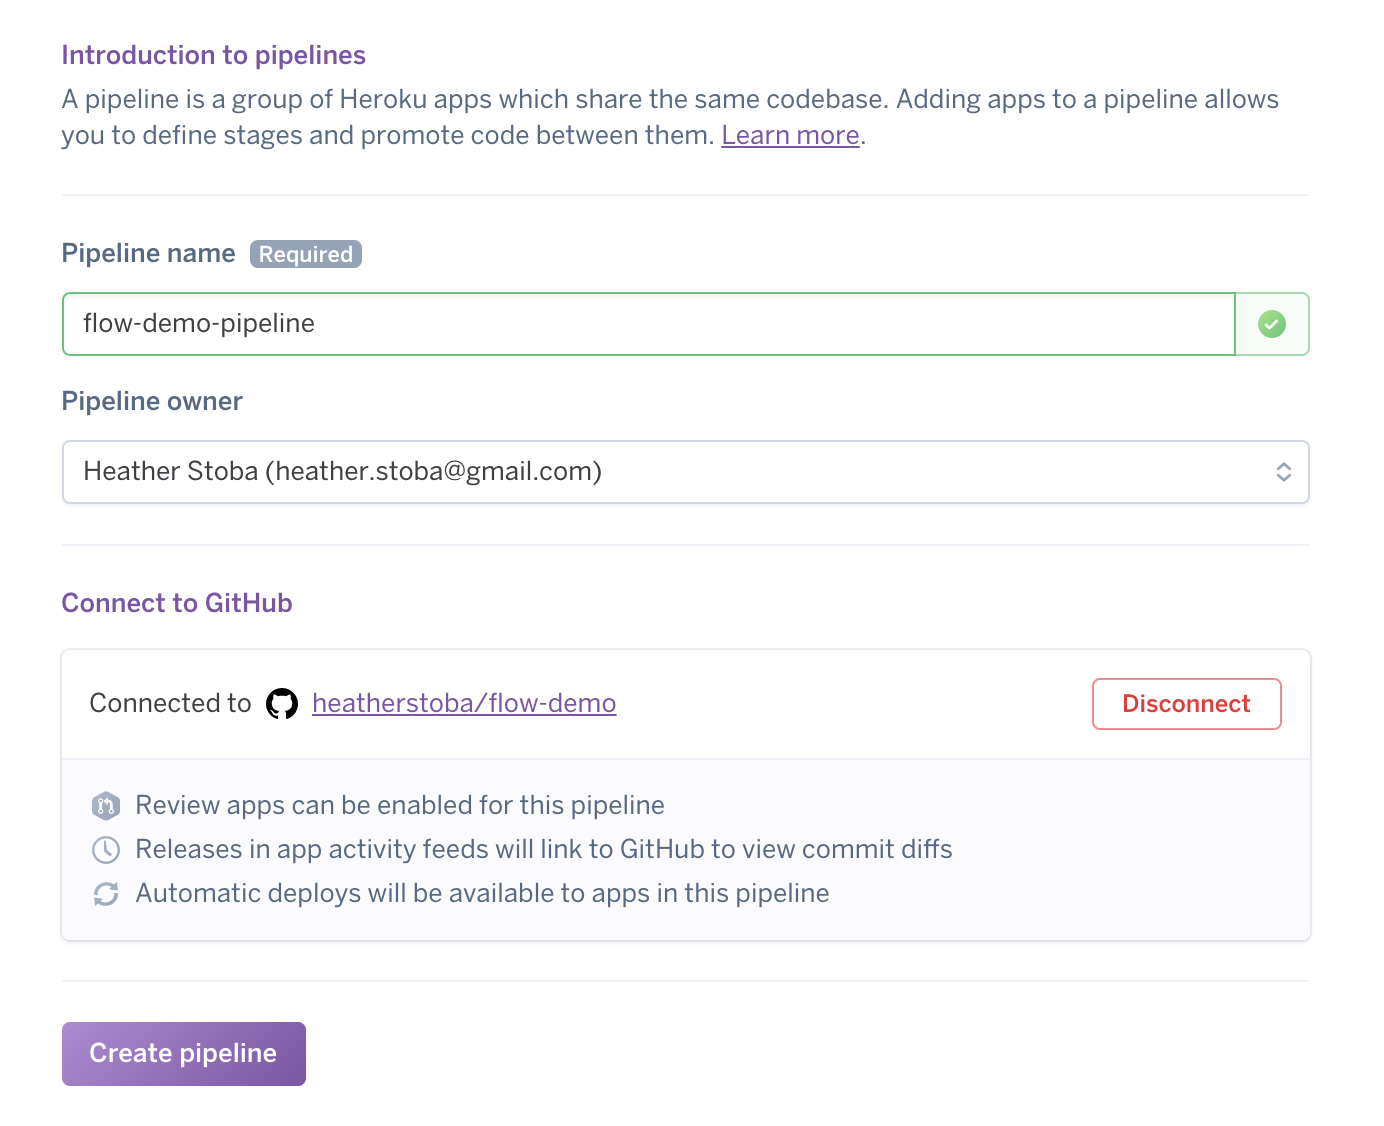
- Give your new pipeline a name (such as flow-demo-pipeline), leave your name under the Pipeline owner field, connect it to the repository you forked in step 1, and click Create Pipeline. /Choisissez un nom pour votre pipeline (par exemple flow-demo-pipeline), laissez votre nom dans le champ Pipeline owner (Propriétaire du pipeline), connectez-le au dépôt que vous avez copié à l’étape 1, et cliquez sur Create Pipeline (Créer le pipeline).
Run review apps: /Exécutez des applications de contrôle :
Now that you have a pipeline, let’s create apps so you can spin up a review app (Review apps work only when there is at least one app in the pipeline): /Maintenant que vous avez un pipeline, nous allons créer des applications pour que vous puissiez tester les applications de contrôle (les applications de contrôle ne fonctionnent que s’il y a au moins une application dans le pipeline) :
- To create a new app, under Staging click Add app… then Create new app. Give your app a name (such as flow-staging-demoapp) and select Create app. /Pour créer une nouvelle application, dans Staging, cliquez sur Add app… (Ajouter une application…) puis sur Create new app (Créer une nouvelle application). Donnez un nom à votre application (par exemple flow-staging-demoapp) et choisissez Create app (Créer une application).
- Next, create a production app following the same steps. Under Production, click Create new app and give it a name (such as flow-production-demoapp). /Ensuite, suivez les mêmes étapes pour créer une application en production. Dans Production, cliquez sur Create new app (Créer une nouvelle application) et choisissez son nom (par exemple flow-production-demoapp).
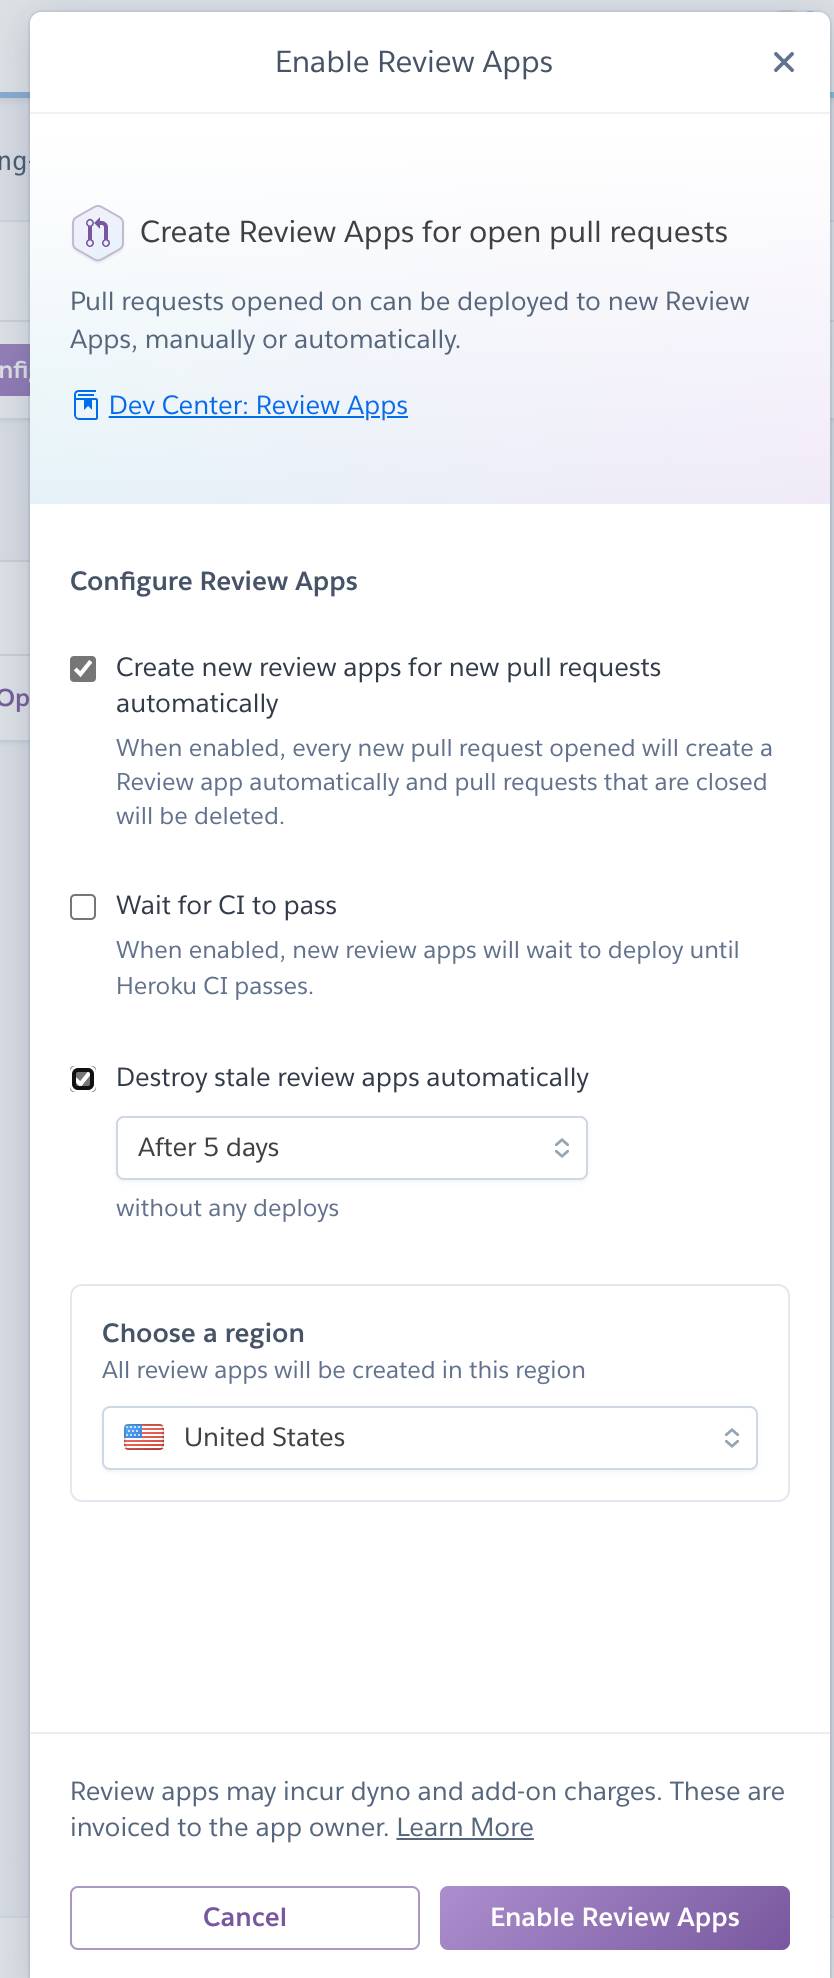
- Once you create a staging app, the Enable Review Apps option becomes available. In the Review Apps column, click Enable Review Apps, and select Create new review apps for new pull requests automatically. This creates a review app for each pull request you make in the connected GitHub repository. If you’re planning to use this pipeline for this module and testing purposes only, select Destroy stale review apps automatically then click Enable. /Une fois que vous aurez créé une application de staging, l’option Enable Review Apps (Activer Review Apps) sera disponible. Dans la colonne Review Apps, cliquez sur Enable Review Apps (Activer Review Apps), et sélectionnez Create new review apps for new pull requests automatically (Créer automatiquement de nouvelles applications de contrôle pour les nouveaux pull requests). Cela créera une nouvelle application de contrôle pour chaque pull request que vous effectuerez dans le dépôt GitHub connecté. Si vous comptez utiliser ce pipeline uniquement pour ce module et à des fins de test, sélectionnez Détruire automatiquement les applications de contrôle obsolètes, puis cliquez sur Activer.
- Click the small arrows next to your staging app and click Configure automatic deploys. Keep the branch on master and click Enable Automatic Deploys. /Cliquez sur les petites flèches situées à côté de votre application de staging, puis cliquez sur Configure automatic deploys (Configurer les déploiements automatiques). Gardez la branche master et cliquez sur Enable Automatic Deploys (Activer les déploiements automatiques).
- Now we’re going to make some changes to your GitHub repository, and see how it’s reflected in your Heroku pipeline. /Nous allons maintenant effectuer quelques changements à votre dépôt GitHub, et voir comment ils seront reflétés dans votre pipeline Heroku.
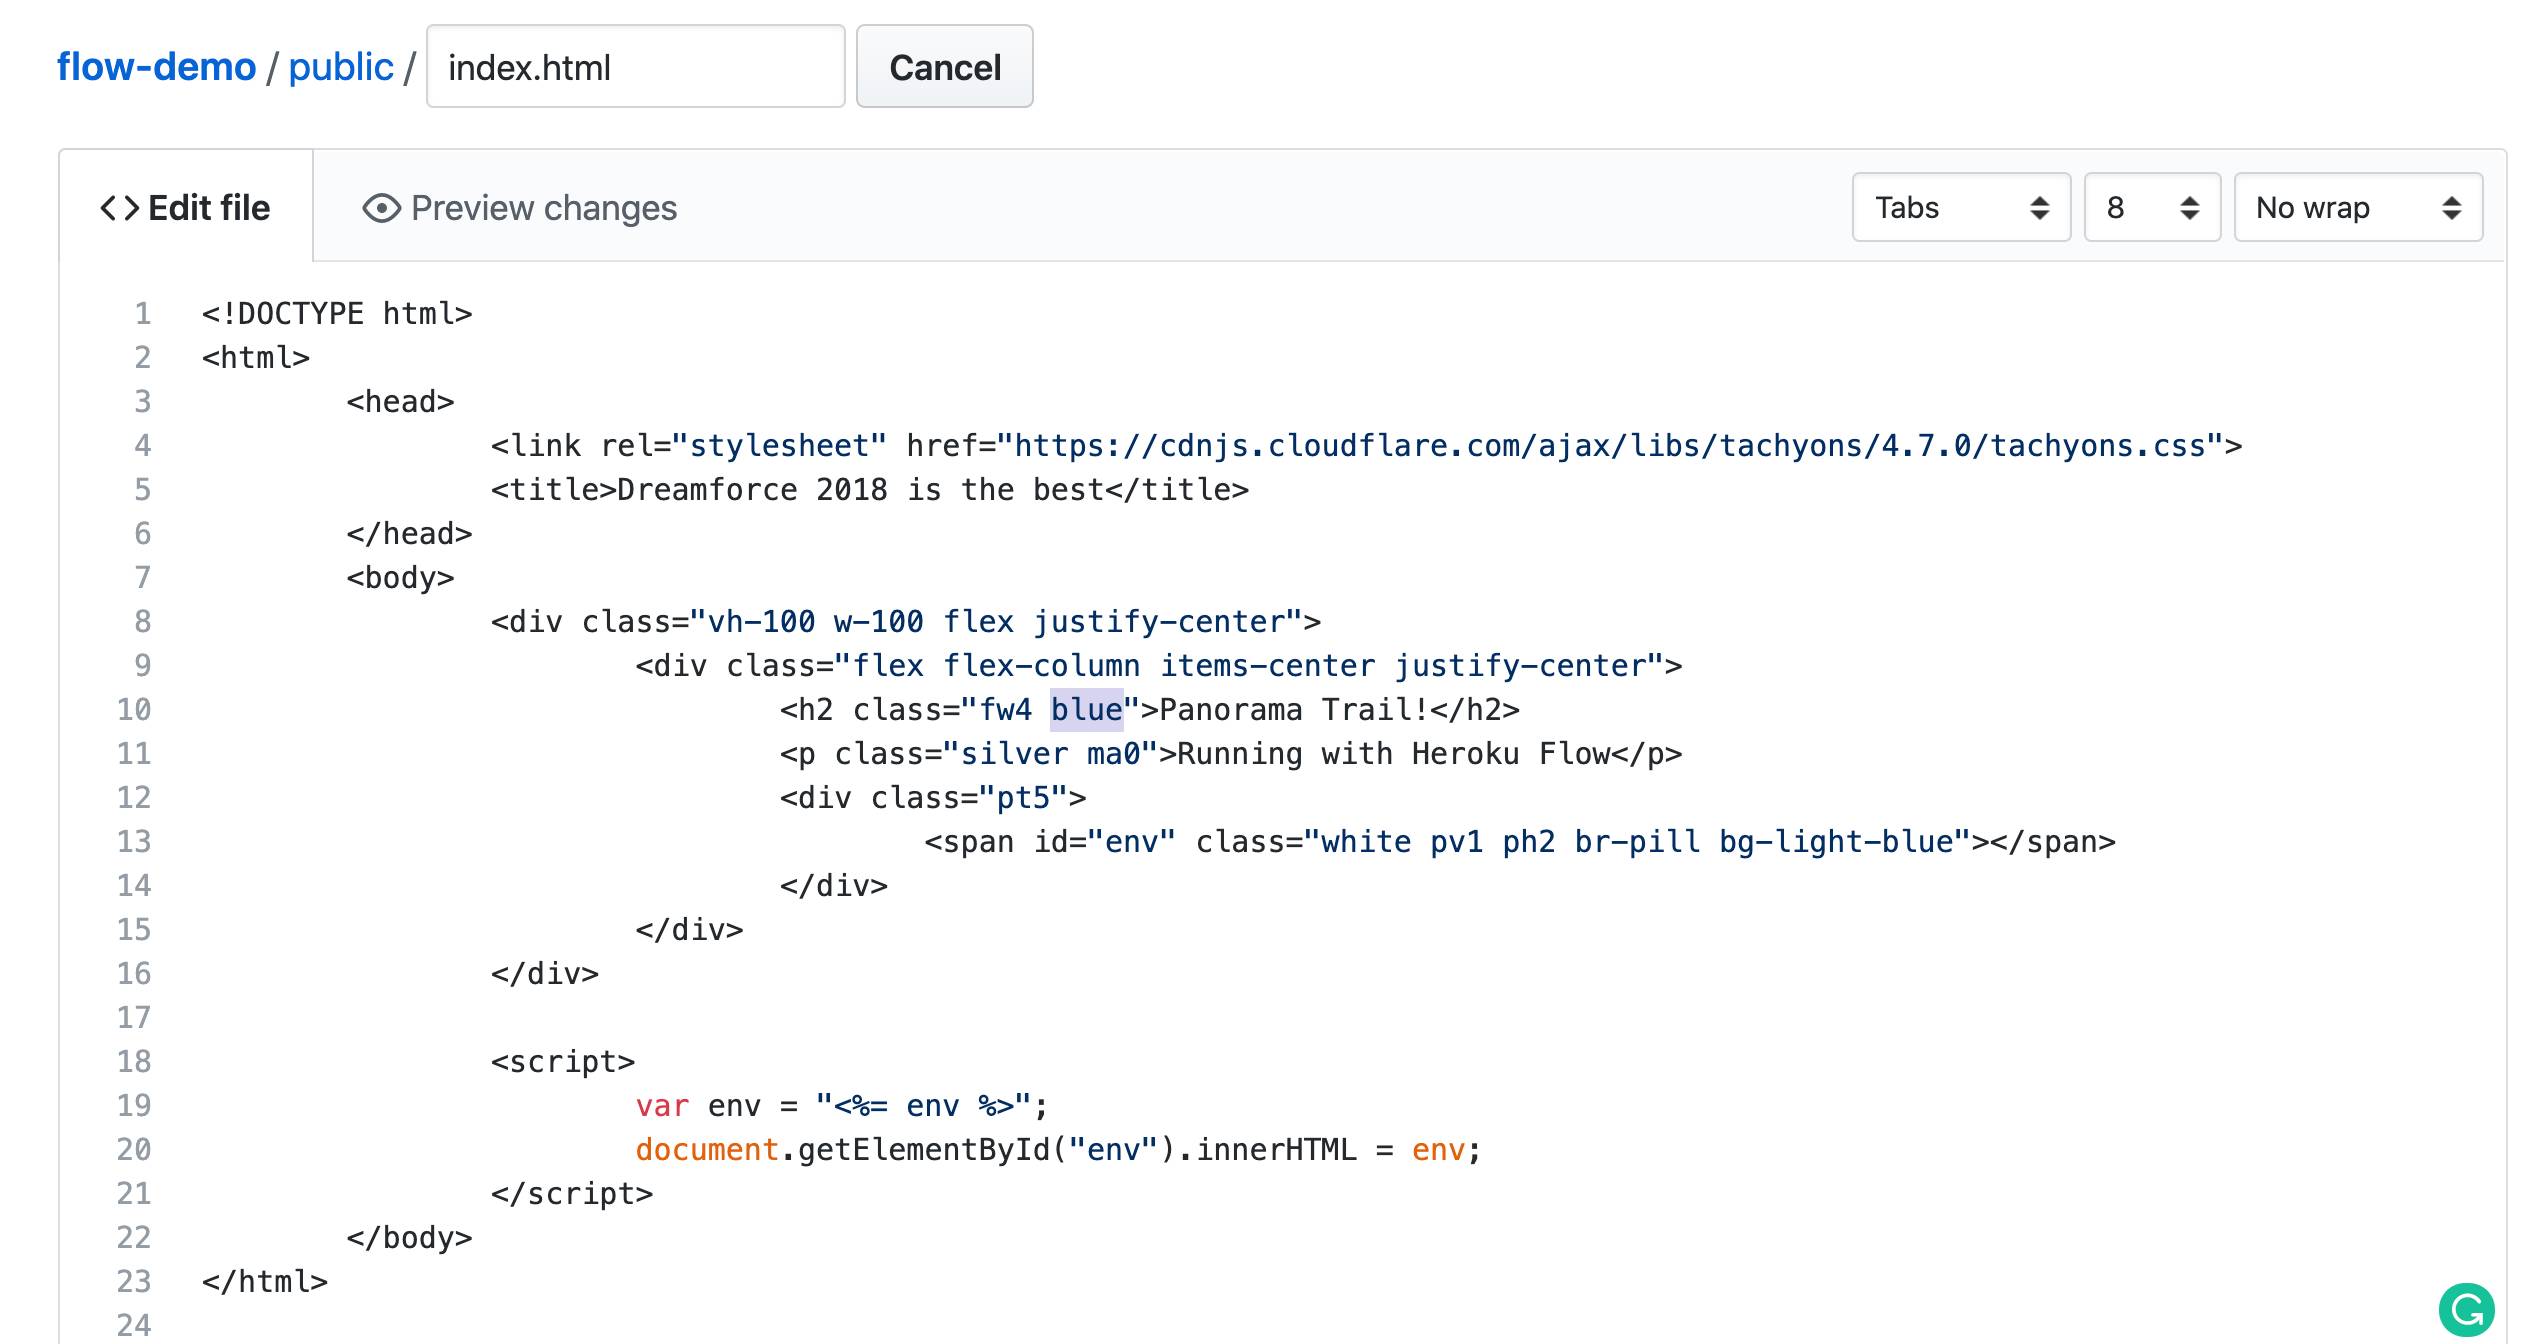
- In GitHub, go to the flow-demo repository you forked earlier. Click the Public folder to open it, then click the index.html file. /Dans GitHub, allez au dépôt flow-demo que vous avez copié plus tôt. Cliquez sur le dossier Public pour l’ouvrir, puis sur le fichier index.html.
- Click the small pencil icon in the top-right corner to edit index.html. /Cliquez sur l’icône en forme de petit crayon en haut à droite pour modifier index.html.
- Now let’s make some small changes to the text and font color. We’ll keep it simple since you’re still learning about Heroku Flow: Change the h2 color from blue to green and the p class text from Running with Heroku Flow to Built with Heroku. /Nous allons maintenant modifier légèrement le texte et la couleur de la police. Nous nous contenterons de petits changements, puisque vous êtes encore en train de découvrir Heroku Flow : Changez la couleur de h2 de blue à green, puis modifiez le texte de l’élément p class pour remplacer Running with Heroku Flow par Built with Heroku.
- Scroll down now and enter a short commit title and description. Then select Create a new branch for this commit and start a pull request, leave the branch name as default, and click Propose file change. /Faites défiler vers le bas et entrez un titre et une description au commit. Puis choisissez Create a new branch (Créer une nouvelle branche) pour ce commit et lancez un pull request, gardez le nom de branche par défaut, puis cliquez sur Propose file change (Proposer une modification du fichier).
- On the next page, you can review the changes you’ve made. Click Create Pull Request. /À la page suivante, vous pourrez vérifier les changements que vous avez effectués. Cliquez sur Create Pull Request (Créer un pull request).
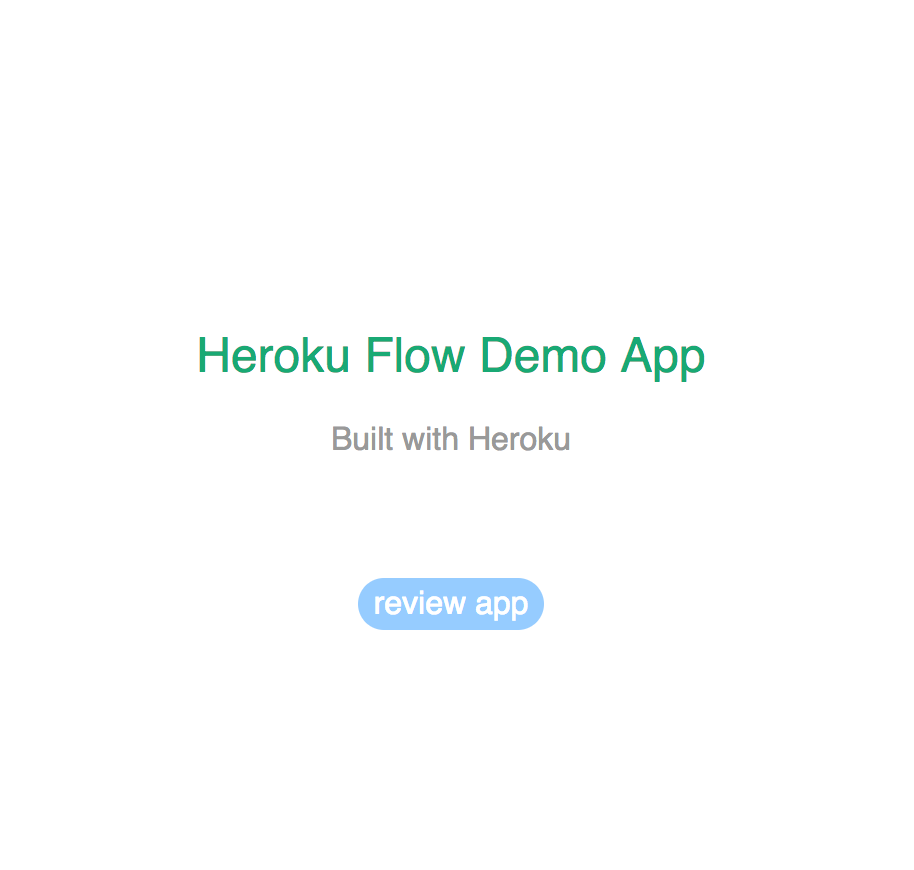
- Go back to your Heroku Dashboard, and notice a new review app in the review apps column. To see how the changes you made look in a browser window, click the small arrows next to the review app, then Open app in browser. /Retournez sur le tableau de bord Heroku, où vous pourrez remarquer une nouvelle application dans la colonne Review Apps. Pour voir les changements que vous avez effectués dans une fenêtre de navigateur, cliquez sur les petites flèches à côté de l’application de contrôle, puis sur Open app in browser (Ouvrir l’application dans un navigateur).


Deploy to production: /Déployer en production :
You can see that the review app reflects the changes you just made to the code in GitHub. Congratulations on making your first Heroku Pipeline and review app. We can now move forward with merging changes back to the master branch. /Vous pouvez voir que l’application de contrôle reflète les changements que vous venez d’apporter au code sur GitHub. Bravo pour votre premier Pipeline Heroku et votre première application de contrôle. Nous allons pouvoir passer à la fusion des changements vers la branche master.
- Go to GitHub and select the Pull Requests tab. Your Update index.html pull request should show up as an open Pull Request. /Retournez sur GitHub et sélectionnez l’onglet Pull Requests. Votre pull request Update index.html doit être signalé en tant que Pull Request ouvert.
- Click it to see the PR (pull request) details, select Merge pull request, then Confirm merge. /Pour voir les détails du PR (pull request), choisissez Merge pull request (Fusionner le pull request), puis Confirm merge (Confirmer la fusion).
- Go back to your Heroku Dashboard and you notice that your app is being built under staging. This deployment happens automatically when merging changes back to master since you have previously enabled automatic deploys. /Retournez à votre tableau de bord Heroku, et vous remarquerez que votre application est en cours de compilation dans staging. Ce déploiement se produit automatiquement lorsque vous fusionnez des changements vers la branche master, puisque vous avez activé les déploiements automatiques.
- If you select Open app in browser next to your flow-staging-demoapp, you see the color green and text changes to Built with Heroku showing up. Staging environments are clones of production environments to test all code changes before pushing them to production and making them as part of the final product. Since the staging app looks the same as the review app and there are no issues. We can push it to the final production phase. /Si vous sélectionnez Open app in browser (Ouvrir l’application dans un navigateur) à côté de flow-staging-demoapp, vous verrez la couleur verte et le nouveau texte Built with Heroku. Les environnements de staging sont des clones des environnements de production destinés à tester les modifications du code avant de les envoyer en production pour les intégrer au produit final. Puisque l’application de staging est identique à l’application de contrôle et qu’il n’y a aucun problème, nous pouvons pousser les modifications vers la phase de production finale.
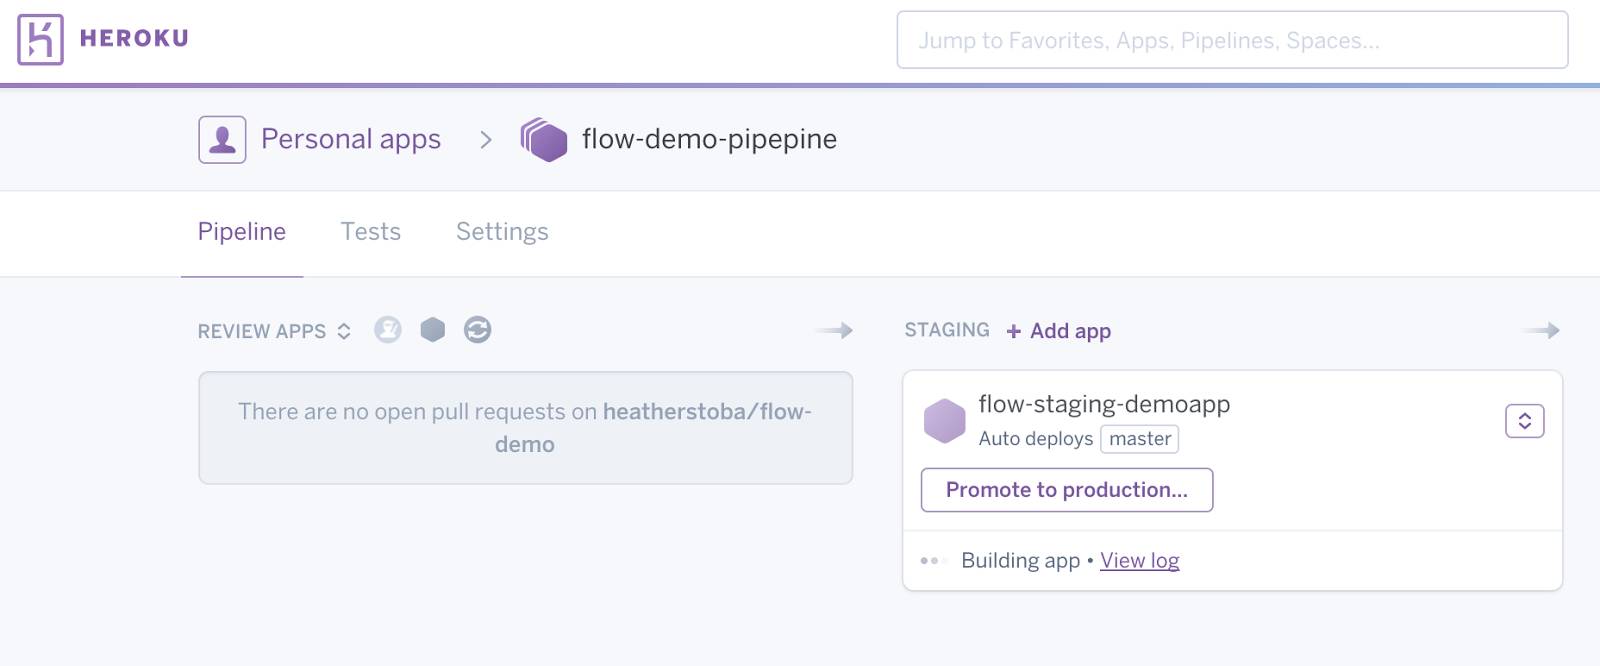
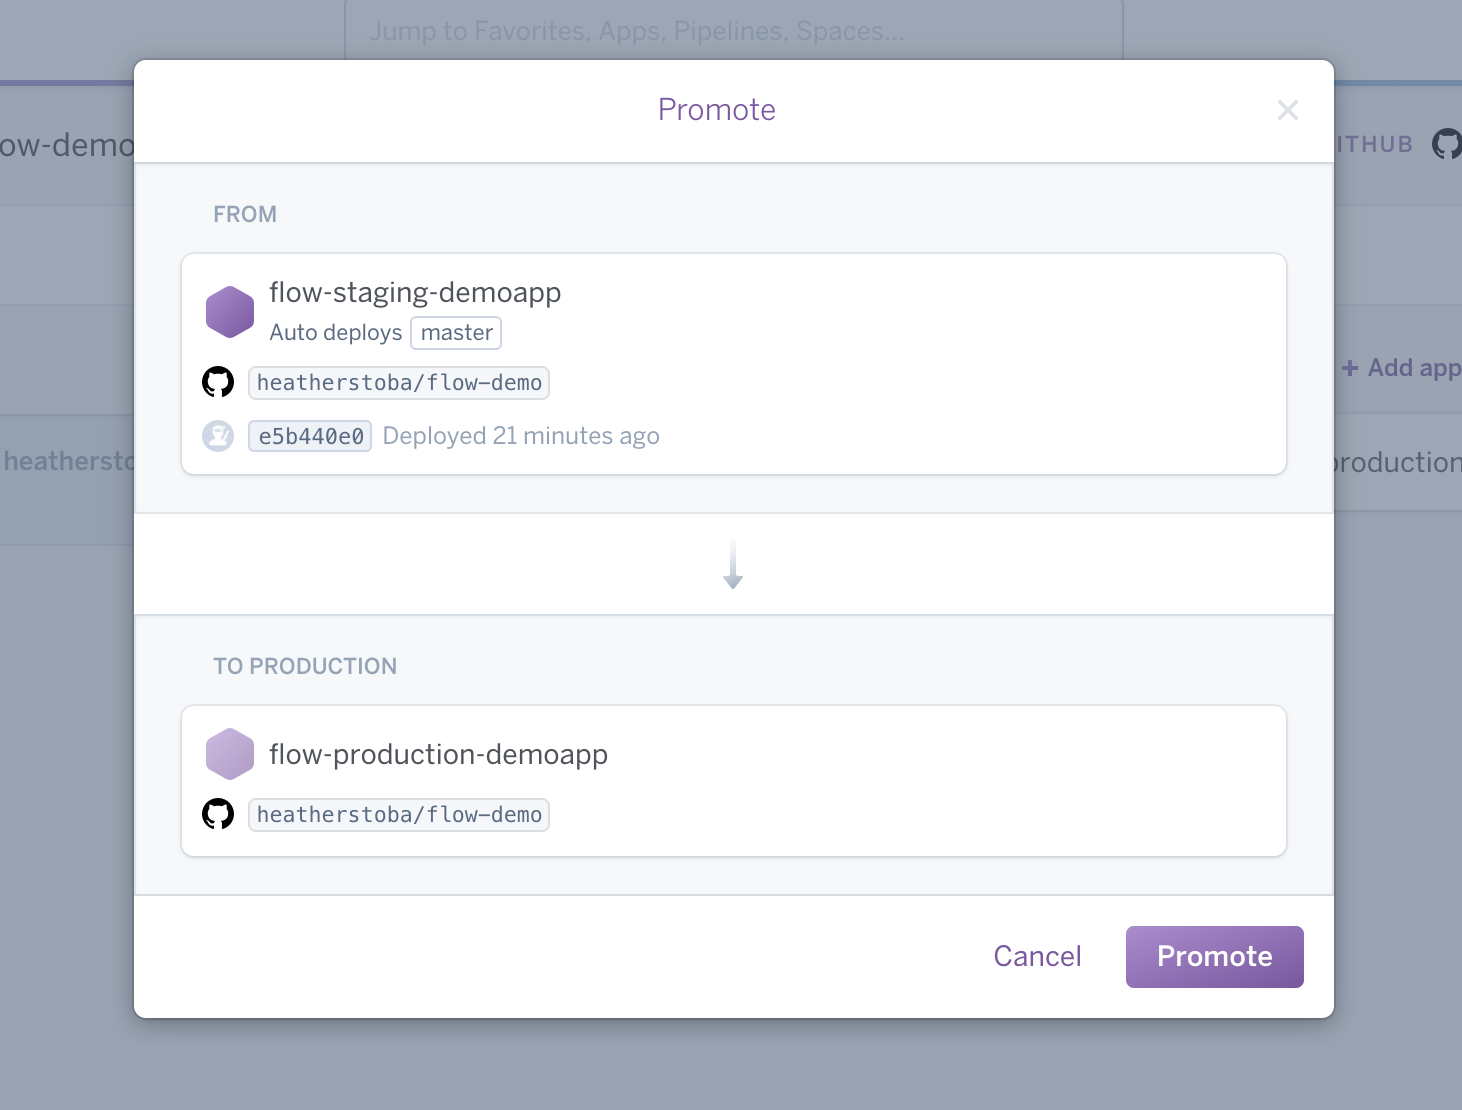
- Select Promote to production to push code changes to production now. Double check the production app name and select Promote. /Sélectionnez Promote to production (Promouvoir en production) pour pousser immédiatement les modifications du code vers l’environnement de production. Revérifiez le nom de l’application de production et choisissez Promote (Promouvoir).
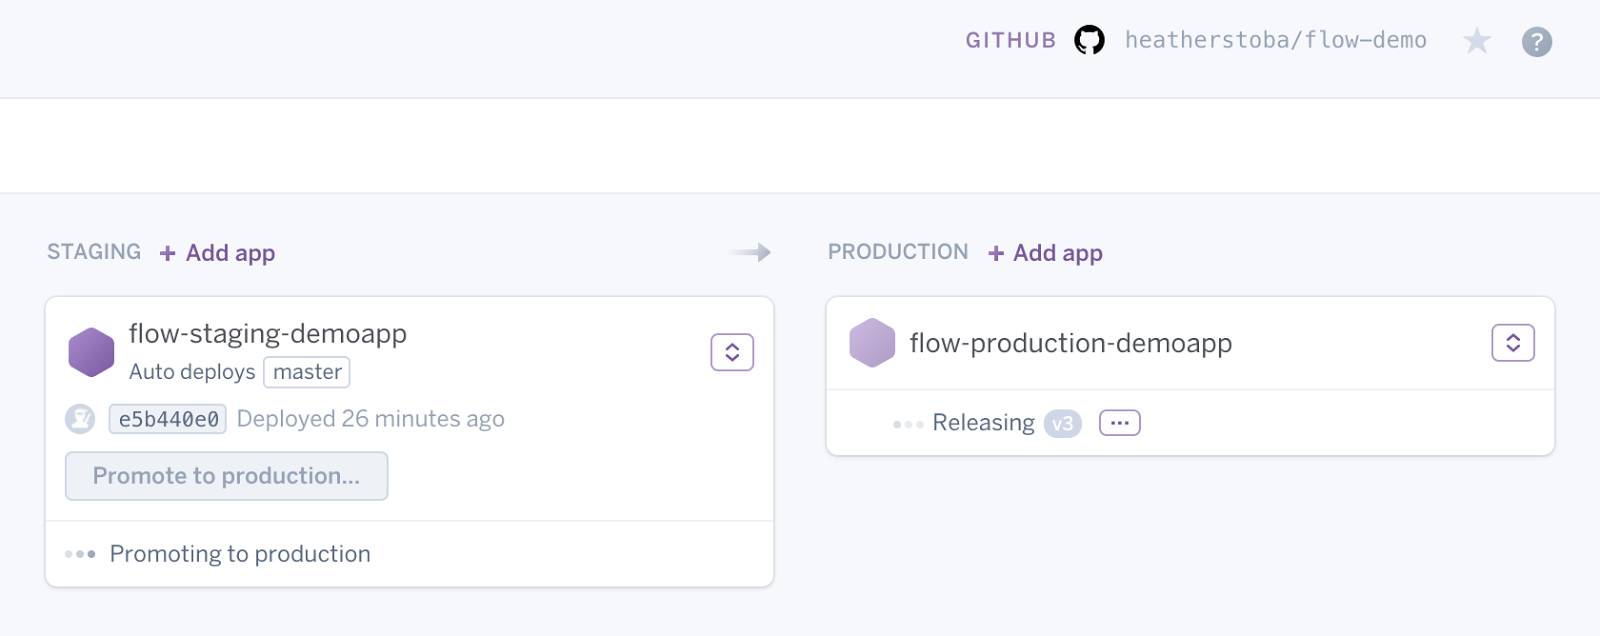
- Notice that the app starts deploying to production. /Vous constaterez que l’application commence à être déployée en production
- Select Open app in browser next to your flow-production-demoapp, and you can see that changes you made to the code have made their way to your final app in production. /Choisissez Open app in browser (Ouvrir l’application dans le navigateur) à côté de flow-production-demoapp, et vous pourrez voir que les changements que vous avez apportés au code ont été transmis à l’application finale en production.